



Blog Summary: Launching a successful label and sticker storefront requires more than putting products online. From shape configuration to instant pricing and proofing workflows, every setup decision impacts the buying experience. This guide walks you through eight practical steps to build a storefront that is accurate, scalable, and ready to sell.
As demand for faster, more efficient label production continues to rise, print service providers are looking for smarter ways to streamline ordering and reduce manual processes. This shift is reflected in the market, with the print & apply label automation market valued at USD 425.33 million in 2025 and projected to grow to USD 469.29 million in 2026, before reaching USD 925.90 million by 2032 at a CAGR of 11.75%. As automation becomes a competitive advantage, launching a robust label and sticker ordering storefront is a practical next step for print businesses.
This guide walks you through configuring a storefront that supports complex shape, material, finish, and pricing combinations while delivering a seamless buying experience. Typical setup time is 2 to 4 weeks using a web-to-print platform. If you're new to label printing, start with our guide on what label printing is before following the setup process outlined below.
Why Label & Sticker Storefronts Need Different Setup Logic
Generic print storefronts are built around flat products with fixed sizes and a handful of paper stocks. Labels and stickers break that model immediately. A single SKU might combine a custom die-line, three material options, four finish choices, and quantity breaks that shift depending on shape. Compare this to a business card storefront, which really only needs to vary paper stock and quantity.
A label and sticker ordering storefront must also account for irregular shapes, bleed and safe zone tolerances, and the difference between kiss-cut and die-cut production paths. Proofing adds another layer of complexity, since the cut line has to match the artwork before anything goes to press. Pricing complexity compounds all of this further. Material waste percentage, tooling for custom dies, ink coverage, and lamination costs all shift depending on shape and size at the same time, not independently.
Any platform used for labels and stickers needs shape-aware, material-aware, and finish-aware pricing logic built in from the start, not added on later. Getting this logic right at setup avoids costly rework once real orders and real customers are relying on the storefront.
Step-by-Step: How to Set Up Your Label & Sticker Storefront
Follow these eight steps in order to configure a storefront that handles the real complexity of label and sticker orders, from catalog setup through final testing.
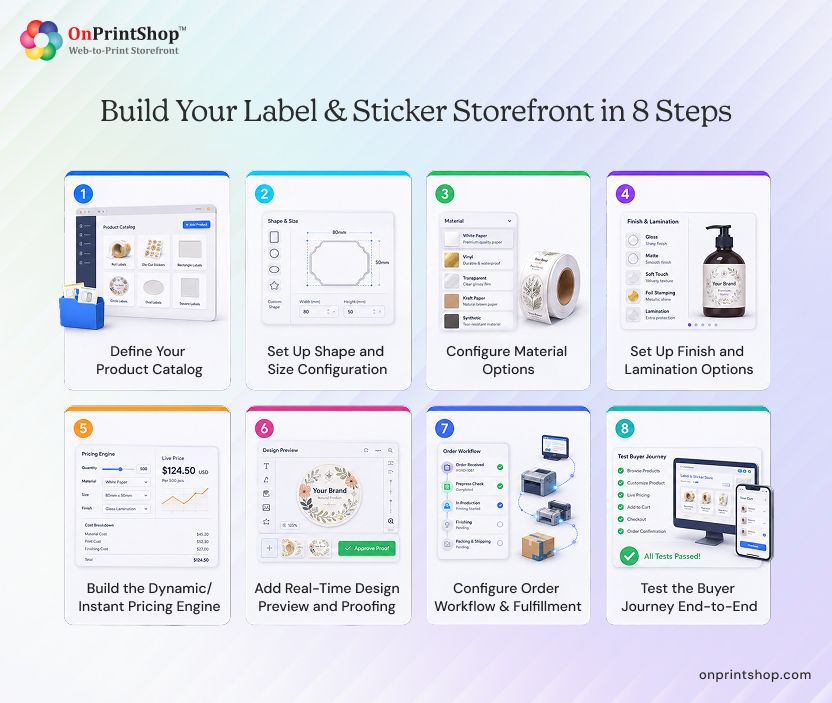
Step 1: Define Your Product Catalog
Start with your core label and sticker product lines: roll labels, sheet labels, die-cut stickers, kiss-cut stickers, and vinyl decals. Treat each as a separate catalog entry with its own production path, not a variant of a single product. Decide upfront whether you are selling B2B, B2C, or both.
Business buyers typically need volume pricing, saved specs, and reorder tools, while individual consumers need a more visual and simplified ordering flow. Many PSPs run a dedicated AI-driven B2B storefront for repeat business accounts alongside a separate B2C storefront for individual buyers, rather than forcing both audiences through one shared catalog.
Step 2: Set Up Shape and Size Configuration
Configure preset shapes for common formats such as circles, rectangles, and ovals, then add support for custom shapes and freeform artwork uploads. Define bleed and safe zone tolerances for every shape so customers cannot submit artwork that gets cut off in production.
Sizing rules should enforce minimum and maximum dimensions per material and per finish, since not every substrate can be cut reliably at every size. A flexible die-cut sticker customization tool lets buyers upload artwork and preview the exact cut line before checkout, which reduces proofing back and forth and lowers reprint rates.
Step 3: Configure Material Options
Material choice drives both cost and durability, so list your available substrates clearly: paper, vinyl, polyester, and BOPP, along with any eco-friendly stock you offer. Each material should carry its own backend pricing tier, since paper labels, weatherproof vinyl, and polyester decals have very different cost structures and waste percentages. Group materials by use case, such as indoor, outdoor, and industrial, so less technical buyers can choose confidently without needing to understand substrate chemistry.
Backend pricing tiers should update automatically as material costs shift, so your storefront margins stay accurate without manual repricing every time a supplier adjusts rates. Listing durability expectations alongside each material also cuts down on support questions after the sale.
Step 4: Set Up Finish and Lamination Options
Offer finish options that match how the label will actually be used: matte, gloss, UV coating, and waterproof laminate. Matte and gloss affect appearance and brand perception, while UV coating and waterproof laminate affect durability in outdoor, refrigerated, or high-handling environments.
Finish should influence pricing logic directly, not sit as a flat add-on fee, since lamination and coating both add material cost and production time that scale with order size. Configuring finish as a true pricing variable, alongside shape and material, keeps your margins accurate across every combination a customer can select on the product page.
Step 5: Build the Dynamic/Instant Pricing Engine
Build a pricing engine that calculates cost in real time based on shape, material, finish, and quantity together, not as separate add-on steps. Set quantity break tiers so unit price drops predictably at higher volumes, which encourages larger orders.
Pricing formulas should account for setup costs, material waste percentage, and tooling for custom die shapes, then recalculate instantly as buyers change any variable on the product page. A reliable instant print pricing software removes manual quoting from the sales process entirely, which is often the single biggest efficiency gain in moving label orders online.

Step 6: Add Real-Time Design Preview and Proofing
Give buyers a way to see their design before they commit to an order. An integrated design studio should let customers start from templates, upload their own artwork, or design directly in the browser, with a live preview that updates as they change shape, size, or material. Real-time preview reduces costly production errors, since customers catch alignment or color issues themselves instead of after printing. For repeat business buyers, saved templates speed up reordering significantly, since they can adjust quantity or minor details without rebuilding the design from scratch.
Step 7: Configure Order Workflow and Fulfillment
Once an order is placed, define what happens next. Set up a structured design proofing and approval workflow so every order gets a digital sign-off before it enters production, which catches errors before they become wasted material. Route approved orders automatically to the correct production queue based on the shape, material, and finish combination.
Centralized print order management keeps every order status visible in one place, from proofing through production to shipping, so staff are not tracking orders across spreadsheets or email threads. Finally, connect shipping integration so tracking information reaches the customer automatically once an order ships.
Step 8: Test the Buyer Journey End-to-End
Before launch, test the complete buyer journey end to end. Walk through pricing for multiple shape, material, and finish combinations to confirm calculations are accurate. Test both B2B and B2C checkout flows separately if you are running dual storefronts. Submit a proof, approve it, and confirm production routing works as expected.
Check the mobile experience specifically, since a large share of reorders and quick B2C purchases happen on phones. Any friction found during testing is far cheaper to fix before launch than after customers start placing real orders. Where possible, ask a colleague unfamiliar with the setup to place a test order and note anywhere they hesitate or get confused.
Must-Have Features Checklist for a Label & Sticker Storefront
Before you launch, confirm your storefront includes each of the following:
- Custom shape upload with automatic bleed and safe zone checking
- Instant pricing calculated across shape, material, finish, and quantity
- Live design preview available before checkout
- Structured proofing and approval built into the order workflow
- Customizable storefront themes that match your brand
- Dedicated B2B support with saved specs and volume pricing
- Simple B2C support with visual, guided ordering
- Responsive design that works cleanly on mobile devices
A complete web-to-print storefront brings all of these features together in one configurable system, rather than a set of disconnected tools that have to be manually stitched together.

Mistakes to Avoid While Building Your Label & Sticker Ordering Storefront
Even well-planned storefronts run into avoidable problems during setup, and most of these mistakes are easier to prevent than to fix after launch. Watch for these common issues:
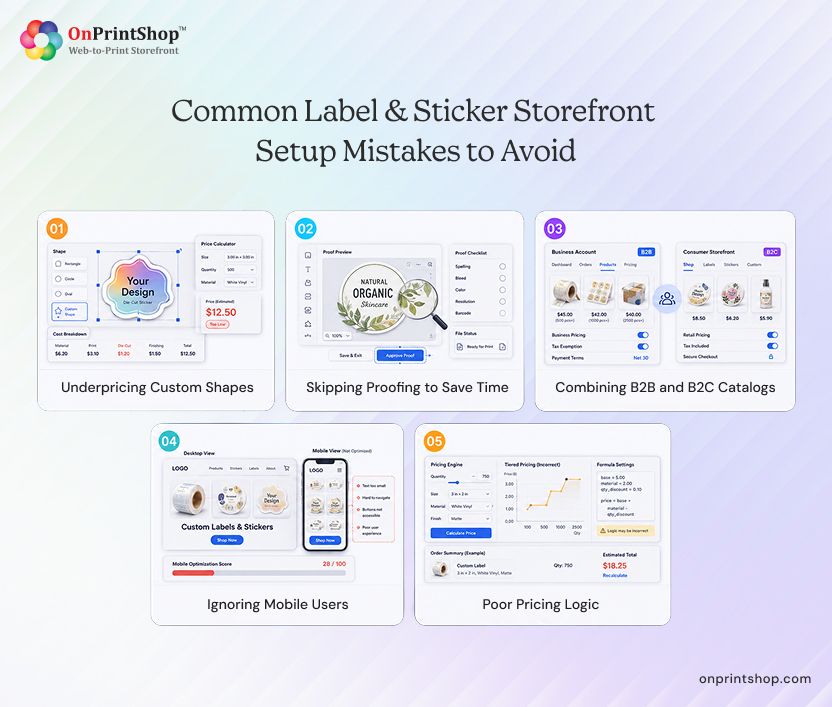
Underpricing Custom Shapes
Custom die-cut shapes cost more to tool and produce than standard rectangles. Pricing them the same as basic shapes erodes margin quickly.
Skipping Proofing to Save Time
Removing the approval step speeds up checkout but increases reprint rates when artwork does not match production requirements.
Combining B2B and B2C Catalogs
Mixing volume pricing logic with simple consumer checkout confuses both audiences and complicates backend pricing management.
Ignoring Mobile Users
A large share of sticker orders, especially smaller B2C purchases, happen on phones. A desktop-only experience quietly loses orders.
Poor Pricing Logic
Treating shape, material, and finish as separate flat fees instead of one integrated formula produces inaccurate quotes and inconsistent margins across product combinations.
How OnPrintShop Helps You Build a Label & Sticker Storefront Faster
OnPrintShop maps directly to each step in this guide. Configurable storefronts support separate B2B and B2C catalogs from the same backend, so business and consumer buyers each get an ordering flow suited to them. Shape, material, and finish configuration is built into purpose-built label and sticker printing software, with pricing rules that update automatically as variables change.
The instant pricing engine calculates cost in real time across every shape, material, finish, and quantity combination, removing manual quoting from the sales process. An integrated designer studio gives customers live preview and template-based design, while structured proofing and approval workflows route every order through sign-off before production.
Production management keeps every order visible from submission through fulfillment, with shipping integration connecting orders to carrier tracking automatically.
ConclusionConfiguring a next-gen label and sticker ordering storefront is a project with a lot of moving parts, but none of them are unusual once broken into steps. Catalog structure, shape and material configuration, instant pricing, proofing, and fulfillment each have a clear job to do, and the order in which you set them up matters less than making sure each one is accounted for before launch.The right web-to-print platform turns this complex configuration into a guided setup rather than a custom software project. Instead of building pricing logic, proofing workflows, and storefront design from scratch, PSPs configure existing tools built specifically for shape-based, material-based print products. That difference often separates a launch that takes weeks from one that takes months, and it keeps ongoing maintenance manageable as your catalog and order volume grow.If you are ready to move from planning to execution, our label and sticker printing solution walks through configuration in more detail. Schedule a demo to see how the setup steps in this guide translate into an actual working storefront.